Have you decided to take the plunge and finally make a website? The setup process is actually way easier than you might think and you’ll be left wondering why you didn’t try it sooner! It doesn’t matter if you’re a beginner Mom-blogger (I’ve definitely been there!) or a budding website developer anyone can create their own website and I’ll show you how to do it!
Let’s get started!
Register Your Domain
Before you begin, you need to purchase and register your domain. A domain is the address of your website and it’s how your clients or readers will find you. Mylistoflists.com is the domain of my website. When choosing your domain, you will want to pick something that makes your company recognizable. If you’re a student or a photographer, a good domain would be your name or the name of your business. Keep it unique and easy to remember. As soon as you decide what you want your domain name to be, you’ll want to register your domain on sites like Go Daddy, Bluehost, or Network Solutions. Domain names can be transferred to any hosting service, so it really doesn’t matter who you buy yours from. Just make sure it’s a trusted source! Your domain name is one of the most important factors when you make a website.
Choose A Hosting Provider
After you have purchased your domain, you will want to pay to have the domain (and your website) hosted on a server. You can choose not to host your website, but you’ll need a hosting provider if you want to make your website legit with things like an SSL certificate and access to all of your backup files. You’ll also need a hosted website to run paid ads on your website space. I’ve hosted my website through Bluehost for the last five years and wouldn’t do it with anyone else! They have the best customer service and they have a live chat available if you need additional service at any hour of the day. It’s worth the money to invest in a quality hosting service! Learn more about my Bluehost experience here.
**Wordpress is free when self-hosted, but you will have access to MUCH more if you pay to host your WordPress website.

Installing WordPress
After you set up your hosting service, you can install WordPress to your domain so you can begin creating content for your website. To install WordPress, you’ll want to head to the cPanel section of your hosting service. You should see a tab that says “Website” click the icon that says “Install WordPress.” After you click the “Get Started” tab, Bluehost will walk you through the rest of the way. You should end up with a fully functional website after you complete the process. You can access the admin side of your website by typing this into your web browser:
www.yourdomain.com/wp-admin
Here you’ll find the place to type in your username and password to make changes to the front end of the website.
Choosing A Theme
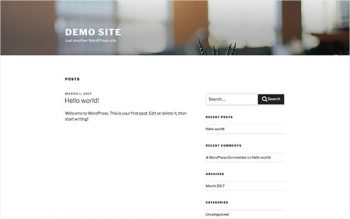
This is the best part of ANY website building process because you FINALLY get to choose what your website looks like! Right now, if you head to www.yourdomain.com your website will look like the following:

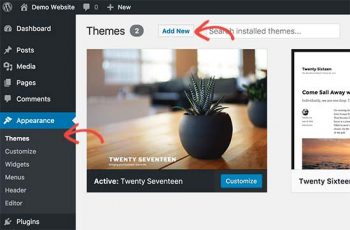
Looks pretty generic, doesn’t it? Change things up by picking a different theme. To edit the theme of your website go to “Appearance” > “Themes” > “Add New.”

If you click the “Add New” section, you’ll find over 20,000 WordPress themes available for download and each is just as customizable as the next. Select one you like (you can even click “preview” to test it out as if it were live”) and download and activate it. Now you have an entirely different website. If you’re going to make a website, surely you want it to look unique!
Add Content
Now you’ll want to add content to your website! Find everything you need in the toolbar (located on the lefthand side) of your WordPress website. You can add a new post by going to “Posts” > “Add New” on the toolbar. From there, the options for your website are absolutely endless! Now you know how easy it is to make a website, so get out there and create yours!


Leave a Reply